ThreeJS : Creating a 3D World

This is part of a series of posts on Project Grid.

  1. Project Grid
  2. ThreeJS : Getting Started
  3. ThreeJS : Creating a 3D World
  4. ThreeJS : Heads Up Display

I would urge you to read the previous blogs in this series if you haven’t already done so. But, if you are impatient (like me) then you can download the source code so far from Google Drive.

Fundamentals of 3D

This post is going to assume a basic knowledge of 3D terminology. Some basic definitions are below but I would encourage some additional reading if you aren’t already familiar.

3D fundamentals

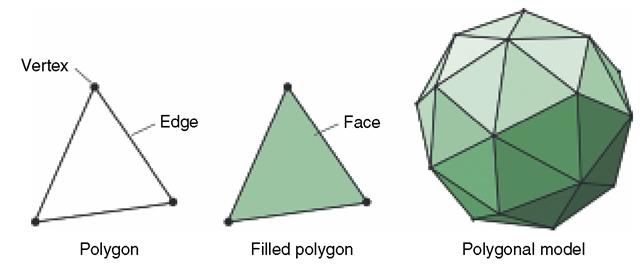
  • Vertex (pl: vertices) – An individual point.
  • Edge – A vectors connecting 2 vertices.
  • Face – A sequence of edges to describe a polygon.
  • Polygon – A sequence of 3 or more edges to describe a face that resides on a single plane.
  • Vector – a direction combined with a magnitude represented using Cartesian coordinates.

Perspective Point Cloud

A point cloud is a particle system where each particle is part of the same geometric structure. A collection of multiple points in 3D space that can be represented by vertices without any edges connecting them to each other. The points can move by changing the coordinates for their specific vertex or the cloud can be moved by changing the position of the collective geometry.

We are going to create a point cloud that will be used to help orientate our camera in 3D space. As we move around the point cloud will give us some perspective of how we are moving relative to the stationary points.

In ThreeJs a point cloud depends upon some geometry and a material. We will be using the PointsMaterial since we want to be able to render each point individually with a texture. We are going to distribute the vertices of our point cloud over a cube that contains our camera.

point cloud

Add the following function:

function initPointCloud() {
    var points = new THREE.Geometry();
    var material = new THREE.PointsMaterial({
        color: 0xffffff,
        size: 0.1,
        map: new THREE.TextureLoader().load('textures/particle.png'),
        transparent: true,
        alphaTest: 0.5
    });

    var size = 15;

    for (var x = -size; x <= size; x++) {
        for (var y = -size; y <= size; y++) {
            for (var z = -size; z <= size; z++) {
                var point = new THREE.Vector3(x, y, z);
                points.vertices.push(point);
            }
        }
    }

    particleSystem = new THREE.Points(points, material);
    sceneMain.add(particleSystem);
}

Note: Ensure you have a suitable texture to load using the TextureLoader and that the path is correct. You can download my example texture from Google Drive.

Ensure you are calling the initPointCloud function from your init function. You should be able to run your code and navigate the scene using WASD to move and mouse click and drag to look around.

This looks pretty cool and helps us orientate ourselves but we can very quickly move beyond the range of the point cloud. What we need to do it to allow it to move with the camera but in such a way that we still feel like we are moving relative to it.

Animating the Scene

Our camera is able to move in 3D space and can be at any theoretical coordinates. We can represent our coordinates in the format [x,y,z] where x is our position along the x-axis, y along the y-axis, and z along the z-axis. Our camera can move gradually from one position to another. As it moves it will be at various positions such as [0.31, 1.57, -7.32] etc.

Our point cloud is stationary at position [0,0,0] and has vertices at various integer positions such as [1,2,3]. If we want to ensure that the point cloud moves with our camera we can simply update the position of the geometry within our animate function.

To retain the perspective of moving within the point cloud we must only update the point cloud within integer increments as the camera moves beyond a threshold, otherwise it will appear to be stationary relative to the camera.

Add the following function:

function updatePointCloud() {
    var distance = cameraPerspective.position.distanceTo(particleSystem.position);

    if (distance > 2) {
        var x = Math.floor(cameraPerspective.position.x);
        var y = Math.floor(cameraPerspective.position.y);
        var z = Math.floor(cameraPerspective.position.z);

        particleSystem.position.set(x, y, z);
    }
}

This function will check for the magnitude distance between the main camera and the point cloud. When it exceeds a threshold of 2 (in any direction), the point cloud position will be updated with the nearest integer coordinates to the camera. This will be a seamless change the the user because all the visible points will be rendered in exactly the same positions.

Ensure you are calling the updatePointCloud function from your animate function (before renderScenes). Now, if you run your code again, you should get the same effect as before but you’ll not be able to move outside the range of the point cloud.

Add Some Points of Interest

Okay, we have a scene, a camera, and a point cloud that gives us perspective when moving. Now we need something to represent the data we want to show later on. I am going to use a colored sphere as I will revisit later to customize the geometry and material based on the data.

Until we have a service that can provide the data that should be added to the scene I will just generate some randomly.

Add the following functions:

function initData() {
    itemGroup = new THREE.Group();

    var geometry = new THREE.SphereGeometry(0.1, 32, 32);
    var material = new THREE.MeshBasicMaterial({ color: 0xff0000, wireframe: true, transparent: true, opacity: 0.5 });

    for (var i = 0; i < 15; i++) {
        var x = getRandom(-20, 20);
        var y = getRandom(-20, 20);
        var z = getRandom(-20, 20);

        var data = new THREE.Mesh(geometry, material);
        data.position.set(x, y, z);

        itemGroup.add(data);
    }

    sceneMain.add(itemGroup);
}

function getRandom(min, max) {
    var min = Math.ceil(min);
    var max = Math.floor(max);

    return Math.floor(Math.random() * (max - min)) + min;
}

This function creates a new group with 15 points of interest. Each point of interest is positioned randomly between -20 and 20 on each axis. Ensure you are calling the initData function from your init function.

A sphere looks okay but it’s much more interesting whilst rotating. Add the following function:

function updateData() {
    itemGroup.children.forEach(function(data) {
        data.rotation.x += 0.01;
        data.rotation.y += 0.01;
        data.rotation.z += 0.01;
    });
}

Ensure you are calling the updateData function from your animate function (before renderScenes). If you run the code you’ll be able to navigate your scene to find each of the 15 points of interest.

Next Steps

Whilst we can navigate our scene and find the points of interest, it is difficult to keep track of where they are relative to your current position – especially when they are far away as they are not visible over a certain distance.

In the next post we will add some HUD (heads up display) features to track the points of interest and provide a visual indicator of their position relative to ours. If you want to download an example of what we have created so far you can do so from Google Drive.

ThreeJS : Getting Started

This is part of a series of posts on Project Grid.

  1. Project Grid
  2. ThreeJS : Getting Started
  3. ThreeJS : Creating a 3D World
  4. ThreeJS : Heads Up Display

What are we going to build?

In my previous Project Grid post I discussed the concept of visualizing content within a 3d grid so I am going to build a 3d world space in which I can plot points, add some temporary controls to navigate world space, and some HUD (heads up display) functionality to help me find plotted points.

You can see a working example here.

I want to use WebGL to render the scene(s) and I will be using ThreeJS to build my scene(s). ThreeJS is a JavaScript library that provides a familiar and consistent way to build  scenes using JavaScript.

Setting the Scene

We can start by creating a new html page. We need to include a <script> for the ThreeJS library. For development / PoC purposes we can just link to the latest build (http://threejs.org/build/three.js) but for a production application you’d want to reference a specific versions and would likely self-host.

We’ll also want to create an in-line <script> element for our scene with some variables, an init function and an animate function.

You should now have something like this:

var container, screenWidth, screenHeight;
var sceneMain, sceneHud;
var cameraPerspective, cameraOrthographic;
var controls, renderer, clock;
var groupItems, particleItems, hudItems;

init();
animate();

function init() {

}

function animate() {

}

We are going to need a WebGL renderer. Add the following function:

function initRenderer() {
    renderer = new THREE.WebGLRenderer({
        antialias: true,
        alpha: true
    });

    renderer.setClearColor(0x000000, 0);
    renderer.autoClear = false; // We want to draw multiple scenes each tick
    renderer.setPixelRatio(window.devicePixelRatio);
    renderer.setSize(screenWidth, screenHeight);

    container.appendChild(renderer.domElement);
}

Next, we need to initialize our main scene and our HUD scene. Add the following functions:

function initSceneMain() {
    sceneMain = new THREE.Scene();
    sceneMain.fog = new THREE.Fog(0x000000, 1, 60);
}

function initSceneHud() {
    sceneHud = new THREE.Scene();
    sceneHud.add(new THREE.AmbientLight(0xffffff));
}

Now we have some scenes, we should create some cameras. Add the following function:

function initCameras() {
    cameraPerspective = new THREE.PerspectiveCamera(
        30,
        1600 / 900,
        0.1, 55
    );

    cameraOrthographic = new THREE.OrthographicCamera(
        1600 / -2,
        1600 / 2,
        900 / 2,
        900 / -2,
        1, 1000
    );
}

Note: Some of the parameters (1600 and 900) are arbitrary as we’ll be updating them after calculating the window dimensions anyway.

We are going to render the main scene with the perspective camera followed by the HUD scene with the orthographic camera. To do this, lets add a render function:

function renderScenes() {
    renderer.clear();
    renderer.render(sceneMain, cameraPerspective);
    renderer.clearDepth();
    renderer.render(sceneHud, cameraOrthographic);
}

Now we have a way to render our scenes we can wire it up from our existing animate function:

function animate() {
    requestAnimationFrame(animate); // This will handle the callback

    var delta = clock.getDelta();

    // Any changes to the scene will be initiated from here

    renderScenes();
}

All that remains is to wire up our existing init function:

function init() {
    container = document.createElement('div');
    document.body.appendChild(container);

    // We'll replace these values shortly
    screenWidth = 1600;
    screenHeight = 900;

    clock = new THREE.Clock();

    initRenderer();
    initCameras();
    initSceneMain();
    initSceneHud();
}

You should be able to test your scene now. It’s not very exciting but we haven’t added anything to it yet. Provided you aren’t getting any console errors, everything is working correctly (so far).

Creating a Background

For our 3d background we are going to use a skybox. A skybox is a very large cube with textures applied to the inside faces. Our camera and everything else it can see is inside this cube so those textures act as the background.

You will need 6 textures – 1 for each face of the cube. You can download my example textures from Google Drive. Add a folder for textures, and within, add another folder for skybox.

To create a skybox from the textures, add the following function:

function initSkybox(scene) {
    var skyboxPath = 'textures/skybox/';
    var skyboxFormat = 'png';

    var skyboxTextures = [
        skyboxPath + 'right.' + skyboxFormat,
        skyboxPath + 'left.' + skyboxFormat,
        skyboxPath + 'up.' + skyboxFormat,
        skyboxPath + 'down.' + skyboxFormat,
        skyboxPath + 'front.' + skyboxFormat,
        skyboxPath + 'back.' + skyboxFormat,
    ];

    var skybox = new THREE.CubeTextureLoader().load(skyboxTextures);
    skybox.format = THREE.RGBFormat;

    scene.background = skybox;
}

If you update your initSceneMain() function and add a function call for initSkybox(sceneMain) you should see a monochrome background in the browser. You should see something like this:

Grid Skybox

Note: You’ll need to serve the html page rather than just open it in the browser. If you try to use a file protocol ThreeJS will throw an CORS error when trying to load the texture(s).

Taking Control

We are going to use some ready made controls for ThreeJS to allow us to quickly navigate around in our scene. We can replace these later with our own custom controls. You’ll need to include another external script in your <head> for http://threejs.org/examples/js/controls/FlyControls.js.

Add a function for initializing the controls and binding them to our perspective camera:

function initControls(target) {
    controls = new THREE.FlyControls(target);
    controls.movementSpeed = 5;
    controls.rollSpeed = Math.PI / 12;
    controls.domElement = container;
    controls.dragToLook = true;
}

Add a function call for initControls(cameraPerspective) to your init function and update your existing animate function to update the controls:

function animate() {
    ...
    // Any changes to the scene will be initiated from here 
    controls.update(delta);
}

Now you can use mouse click / drag to look around within your scene. You can also use WASD to move but until you render something you’ll not be able to tell you’re moving yet.

Finishing Touches

We need to account for the window dimensions changing if a browser gets resized or if orientation changes on a mobile device. Add the following functions:

function initWindow() {
    screenWidth = window.innerWidth;
    screenHeight = window.innerHeight;

    renderer.setSize(screenWidth, screenHeight);
    resetCameras();
}

function resetCameras() {
    cameraPerspective.aspect = screenWidth / screenHeight;
    cameraPerspective.updateProjectionMatrix();

    cameraOrthographic.left = screenWidth / -2;
    cameraOrthographic.right = screenWidth / 2;
    cameraOrthographic.top = screenHeight / 2;
    cameraOrthographic.bottom = screenHeight / -2;
    cameraOrthographic.updateProjectionMatrix();
}

Ensure that you update the init function to call initRenderer, initCameras, initWindow, then everything else. The order is important. Lastly, you can add an event handler to call your initWindow function when the window is resized:

window.addEventListener('resize', initWindow, false);

Next Steps

In the next post we will start adding objects to our scene(s) and animating them. If you want to download an example of what we have created so far you can do so from Google Drive.

Project Grid

This is part of a series of posts on Project Grid.

  1. Project Grid
  2. ThreeJS : Getting Started with ThreeJS
  3. ThreeJS : Creating a 3D World
  4. ThreeJS : Heads Up Display

Conceptual Overview

This is a multi-part series of blog posts on a project to create a web application providing a new way to organize and visualize content. The idea is to map the url – particularly the path, into grids that can contain different types of content. The content can be found based on its location (e.g. /something/something-else/?x=100&y=-250&z=300) which corresponds to a grid called “something-else” existing within another grid called “something” and at the 3D co-ordinate location [100,-250,300].

As such, out web application will render a visualization of 3D space in the browser and provide controls for navigating within that space as well as controls to travel between grids (navigation up and down the request path). It will also provide a way to visualize different types of content that can exist within a grid such as images, video, audio etc. These content types will be extensible so that new types can be added in the future.

This concept would provide a way to store a vast amount of content which can be consumed in a familiar and intuitive way. We can also provide features to help users locate content within grids that manipulate the 3D world to either transport the user to particular locations or to temporarily transport the content to them. Imagine for example being able to create a gravitational object that only affected content of a certain type within the current grid so that images, for example, were attracted to the users current location in 3d space temporarily.

Technology Stack

For this project, I will be building a REST service in ASP.NET Core that will use a document database to store the content that exists within a grid along with views to query that data based on the top level grid (e.g. the host), the specific grid (e.g. the path), and the co-ordinates (e.g. the query string).

The user interface will use WebGL for the 3D visualization and be implemented as a responsive experience. The interface will be optimized for desktop initially but the long term goal would be for this interface to work well across all devices that have a web browser and support WebGL so gesture support will be considered throughout.

Proof of Concept

This concept is an evolution of a previous 2D implementation which can be found here. You can tap items to interact with them or hold items to move them within the grid. Most items are grid links so you’ll notice that whilst at the root of the web application (/) there is a “Home” item at [0,0] that has no action whilst within a child grid (/contacts) there is a “Back” action at [0,0] that allows you to visit the parent grid – climbing up the path of the web application.

The source code for this 2D proof of concept can be found on GitHub.


The Specification Pattern

What is a Specification?

One of my favorite software development patterns is the specification pattern. This pattern provides a way of encapsulating business logic and helps to enforce the DRY principle.

As always with such things, a contrived example helps articulate the concept…

In a commerce system there are visitors and the business defines an active visitor as having used the system within the last 7 days and having placed an order within the last 30 days.

The specific logic is arbitrary. What is important is that we need to be able to define active visitors in numerous locations throughout our application and, should the business change their definition of an active visitor, we should be able to reflect the change in a single place within our code.

Enter the specification pattern which can be represented by the following interface:

public interface ISpecification<in T>
{
    bool IsSatisfiedBy(T subject)
}

Assuming we have services for checking system usage and order history we can implement this interface for our visitor example.

public class ActiveVisitorSpecification : ISpecification<Visitor>
{
    protected IUsageService Usage { get; set; }
    protected IOrderService Orders { get; set; }

    public ActiveVisitorSpecification(IUsageService usage, IOrderService orders)
    {
        Usage = usage;
        Orders = orders;
    }

    public bool IsSatisfiedBy(Visitor subject)
    {
        if(Usage.HasUsedInLastSevenDays(subject) && Orders.LatestOrderDaysAgo(subject) <= 30)
        {
            return true;
        }

        return false;
    }
}

As you can see from the example, we have encapsulated all the business logic within a single place and can now use this class throughout our application whenever we need to check if a visitor can be considered as being active.

// Get visitor
var customers = context.Visitors.Find(id);

// Initialize specification
var specification = new ActiveVisitorSpecification(usageService, orderService);

// Apply specification
if(specification.IsSatisfiedBy(c))
{
    // Do something with active visitor
}

Chaining multiple specifications

Whilst it’s great to encapsulate the business logic for active visitors within a single class, we might have been a little hasty. We didn’t stop to consider that the business has business logic to define other visitor groups such as recent visitors and recent customers.

The business defines a recent visitor as having used the system within the last 7 days and a recent customer as having placed an order within the last 30 days.

We can create a specification for each of these examples but now we are duplicating business logic across specifications instead. Still better than across the entire application but not a great improvement from what we originally had.

Instead we can use chaining to create discrete specifications for each of the specific examples and chain them together for the original definition of an active visitor being both a recent visitor and a recent customer.

Chaining is achieved by creating specifications that can apply boolean logic to other specifications. They implement the IsSatisfiedBy method just as before but their implementation is based on && (and), || (or), or ! (not) logic.

AndSpecification

public class AndSpecification<T> : ISpecification<T>
{
    protected ISpecification<T> Left { get; set; }
    protected ISpecification<T> Right { get; set; }

    public AndSpecification(ISpecification<T> left, ISpecification<T> right)
    {
        Left = left;
        Right = right;
    }

    public bool IsSatisfiedBy(T subject)
    {
        return Left.IsSatisfiedBy(subject) && Right.IsSatisfiedBy(subject);
    }
}

As you can see above, the implementation is very straightforward. It just checks if both the left AND right specifications are satisfied by the subject.

OrSpecification

public class OrSpecification<T> : ISpecification<T>
{
    protected ISpecification<T> Left { get; set; }
    protected ISpecification<T> Right { get; set; }

    public OrSpecification(ISpecification<T> left, ISpecification<T> right)
    {
        Left = left;
        Right = right;
    }

    public bool IsSatisfiedBy(T subject)
    {
        return Left.IsSatisfiedBy(subject) || Right.IsSatisfiedBy(subject);
    }
}

Once again, the implementation is very straightforward. It just checks if either the left OR right specifications are satisfied by the subject.

NotSpecification

public class NotSpecification<T> : ISpecification<T>
{
    protected ISpecification<T> Not { get; set; }

    public NotSpecification(ISpecification<T> not)
    {
        Not = not;
    }

    public bool IsSatisfiedBy(T subject)
    {
        return !(Not.IsSatisfiedBy(subject));
    }
}

This one is a little different as it simply checks that the specification is NOT satisfied by the subject.

Syntactic Sugar

Whilst this provides us a mechanism to chain multiple specifications together to create more complicated ones it isn’t pretty to instantiate these specifications – especially when nesting them within each other.

We can use static extension methods to add some syntactic sugar and make these really easy to use.

For example, for the AndSpecification we could have the following extension method:

public static ISpecification<T> And<T>(this ISpecification<T> left, ISpecification<T> right)
{
    return new AndSpecification<T>(left, right);
}

Now, we can replace our original ActiveVisitorSpecification with the following:

var recentVisitor = new RecentVisitor(usageService);
var recentCustomer = new RecentCustomer(orderService);
...
var activeVisitor = recentVisitor.And(recentCustomer);

We can even take it a step further and expose composite specifications (specification that are constructed by chaining others) within static methods so that we don’t duplicate the chaining in multiple places.

As with any pattern, the application of it depends on the individual developer.

Linq and IQueryable

The observant among you will have noticed that, whilst this is fine when we are dealing with individual customers, there may be times when we want to use a specification as a predicate for multiple customers.

This can be achieved by extending our original ISpecification<in T> interface.

public interface IWhereSpecification<T> : ISpecification<T>
{
    Expression<Func<T, bool>> Predicate { get; }
    IQueryable<T> SatisfiesMany(IQueryable<T> queryable);
}

A Predicate property exposes an expression that describes the specification using a predicate function whilst a new SatisfiesMany method takes an IQueryable<T> and returns an IQueryable<T> after having applied the specification.

Below is an abstract implementation of this interface:

public abstract class WhereSpecification<T> : IWhereSpecification<T>
{
    private Func<T, bool> _compiledExpression;
    private Func<T, bool> CompiledExpression { get { return _compiledExpression ?? (_compiledExpression = Predicate.Compile()); } }
    public Expression<Func<T, bool>> Predicate { get; protected set; }

    public bool IsSatisfiedBy(T subject)
    {
        return CompiledExpression(subject);
    }

    public virtual IQueryable<T> SatisfiesMany(IQueryable<T> queryable)
    {
        return queryable.Where(Predicate);
    }
}

Any subsequent concrete implementations can simply set the Predicate property.

We can also chain the specifications together as before by using a BinaryExpression when defining the subsequent predicate.

Now, when dealing with an IQueryable<T> you can reduce it using a specification and if you are using LINQ to SQL (e.g. Entity Framework) then the expression will be converted to a query meaning that you are only requesting a subset of data from SQL instead of requesting everything and reducing it in-memory.

Download from NuGet

If you want to use an existing implementation of the specification pattern you can do so by adding the Vouzamo.Specification NuGet package to your project.

Additionally, you can review the source on GitHub.