
This is part of a series of posts on Project Grid.
- Project Grid
- ThreeJS : Getting Started
- ThreeJS : Creating a 3D World
- ThreeJS : Heads Up Display
- ASP.NET Core & Azure DocumentDB: Modeling the Domain
I would urge you to read the previous blogs in this series if you haven’t already done so. But, if you are impatient (like me) then you can download the source code so far from Google Drive.
What is a HUD?
A HUD (or heads up display) is a 2D user interface that overlays our 3D scene and provides useful information to help us interact with the geometry.
We facilitate a HUD by having a second scene (sceneHud) in which we can manage our HUD objects and an orthographic camera (cameraOrthographic) to render them in 2 dimensions.
 function renderScenes() {
     renderer.clear();
     renderer.render(sceneMain, cameraPerspective);
     renderer.clearDepth();
     renderer.render(sceneHud, cameraOrthographic);
 }
In the above code you can see we have been rendering our sceneHud all along but since it doesn’t contain anything yet, there is nothing visual as a result.
Populating Our HUD
Our HUD is going to be responsible for rendering a 2D projection of pointers to some tracked 3D objects from sceneMain.
We want to project an imaginary circle onto our HUD and render a cone over each tracked object. If the tracked object falls inside the imaginary circle, we can orientate it towards the camera to render a circular silhouette. Otherwise, we can orientate it to point towards its target object and position it on the circumference of our imaginary circle. Additionally, we are going to ignore any tracked objects that are behind the near clipping plane of our perspective camera.
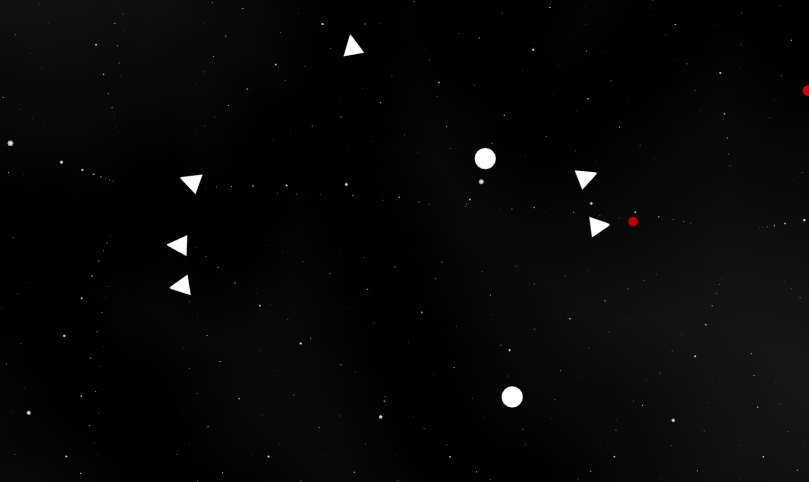
This should give us something like the image above where we have a combination of spheres and cones to track objects and help us navigate towards them.
Note: In the future we will likely replaces the spheres that overlay tracked objects within the 2D projected circle with some identifying information instead.
Adding Objects to the HUD
The first stage is to create a new THREE.Group to manage the HUD objects and a THREE.Mesh for each cone.
Add the following functions:
function initHudData() {
    hudGroup = new THREE.Group();

    sceneHud.add(hudGroup);
}

function addHudData(trackedItem) {
    var hudGeometry = new THREE.ConeGeometry(0.1, 0.2, 16);
    hudGeometry.rotateX(Math.PI * 0.5);
    var hudMaterial = new THREE.MeshPhongMaterial({ color: 0xffffff, side: THREE.DoubleSide });

    var hudData = new THREE.Mesh(hudGeometry, hudMaterial);

    hudData.scale.set(200, 200, 200);
    hudData.visible = false;
    hudData.tracked = trackedItem;

    hudGroup.add(hudData);
}
You’ll need to ensure you call the initHudData function from within your initSceneHud function but now, when creating your items in the initData function you can track them by calling the addHudData function and passing the data.
function initData() {
    ...
    for (var i = 0; i < 15; i++) {
        ...
        addHudData(data);

        itemGroup.add(data);
    }
    sceneMain.add(itemGroup);
}
Note: You won’t be able to see anything yet because we set the visible property of the HUD objects to false when we initialized them.
Animating the HUD Objects
We will need to update the visibility and orientation of each of our HUD objects based on the orientation of the camera and the position of items in the sceneMain relative to the camera.
We need to iterate over each HUD object and check if it is in front of the near clipping plane of the cameraPerspective. This will determine the visibility of each respective HUD object.
Add the following functions:
function checkCameraPlane(obj, camera) {
    var cameraDirection = camera.getWorldDirection();
    var objectDirection = new THREE.Vector3(0, 0, 0);
    objectDirection.subVectors(obj.position, camera.position);

    return cameraDirection.dot(objectDirection) >= 0;
}

function findHudPosition(obj, camera) {
    var vector = new THREE.Vector3();

    obj.updateMatrixWorld();
    vector.setFromMatrixPosition(obj.matrixWorld);
    vector.project(camera);

    vector.x *= (screenWidth / 2);
    vector.y *= (screenHeight / 2);
    vector.z = 1;

    return vector;
}
The checkCameraPlane function will determine the dot product for a vector representing the orientation of the camera and a vector between the camera and an object. If the dot product is greater than or equal to zero, we can consider the object to be in front of the camera.
The findHudPosition function will project a 3D perspective world position to a 2D orthographic screen position.
Add the following function:
function updateHudData() {
    var centerPoint = new THREE.Vector3(0, 0, 1);

    hudGroup.children.forEach(function (data) {
        var target = data.tracked;

        if (checkCameraPlane(target, camera)) {
            var position = findHudPosition(target, camera);

            if (position.distanceTo(centerPoint) <= 400) {
                data.lookAt(cameraOrthographic);
            } else {
                data.lookAt(position);
                position.clampLength(0, 400);
            }

            data.position.set(position.x, position.y, position.z);
            data.visible = true;
        } else {
            data.visible = false;
        }
    });
}
We need to ensure our updateHudData function is called from our animate function after we call our updateData function.
If you run your code now, you should the HUD items should be rendered and will point towards their respective tracked objects (or the camera when within the imaginary circle).
Resources
You can see a working version here.
You can watch a video on YouTube.
You can see the source code on GitHub or download a working example from Google Drive.
What Next?
We are just generating random data for our scene and it is not persistent. In the next post we’ll be using ASP.NET Core and Azure DocumentDB to create a data driven REST API that will provide the data for our Grid.
