LEGO C# SDK – Enhancements & Challenges

Recap

This is a follow-up to my previous post discussing how I went about creating a C# SDK for the most recent version of the LEGO specification for the Bluetooth (Low Energy) protocol used in a range of their PoweredUp products. Read more here.

Inputs (Sensors)

The biggest improvement so far has been the work to read sensory data from connected devices. There is a lot of upstream and downstream messages required to coordinate this which I detail below for those that are interested.

Input Modes

The input modes are a logical separation allowing a single connected device (e.g. motor) to have different modes of operation for which you can send (output) or receive (input) data.

The protocol allows us to interact with the connected device using either a single mode (e.g. Speed) or a combined mode where supported (e.g. Speed, Absolute Position, and Position).

Single Input

To use single input mode we need to set the desired input mode, delta to trigger updates, and flag whether to notify us (push data) or not (poll data).

This is done by sending a Port Input Format Setup (Single) message which contains:

  • Port # of the connected device (e.g. 0)
  • Mode we wish to set (e.g. Mode 1 / Speed)
  • Delta of change which should trigger an update (e.g. 1)
  • Notify flag whether to automatically send an upstream message when the delta is met.

You can be quite creative using single input. We can calibrate the min and max position of a linear actuator by switching the input modes as below:

  1. Switch input mode to Speed.
  2. Move to absolute minimum position using a lower than normal power (torque).
  3. Monitor changes to Speed until value drops to 0.
  4. Switch input mode to Position.
  5. Record current position as calibrated minimum for device.
  6. Switch input mode to Speed.
  7. Move to absolute maximum position using a lower than normal power (torque).
  8. Monitor changes to Speed until value drops to 0.
  9. Switch input mode to Position.
  10. Record current position as calibrated maximum for device.

These recorded min and max positions can be stored in the SDK against the device to act as constraints for further commands before they are forwarded onto the hub.

Combined Input(s)

Whilst single input is really simple to setup and can be used to make the connected device behave much more intelligently, it is inconvenient and inefficient to have to keep switching modes.

Combining modes allows us to inform the device what combination of modes we are interested in (based on a supported range of options) and receive a message that contains information (data sets) about all modes consolidated.

The setup of this is much more complicated based on how much information is device specific.

Prerequisites

Information about the connected device can be obtained by sending a Port Information Request message. We actually send this message twice so that we can obtain different information types:

  • Port Information
  • Possible Mode Combinations

Port Information provides information from the connected device about general capabilities (e.g. input, output, combinable, synchronizable) and the modes of operation for input and output.

Based on the the port having the capability of being combinable the subsequent message provides information about the range of mode combinations supported (e.g. Mode 1 + Mode 2 + Mode 3). We will need to reference which of these mode combinations we want to utilize later on.

Once we have this information we can determine how to interact with each mode. The main thing we are interested in for the purpose of combining inputs is the value format which communicates how many data sets to expect, the structure of the data etc.

To obtain this information we send a Port Mode Information Request message for each mode. This message contains:

  • Port
  • Mode
  • Information Type (e.g. Value Format)

The message will trigger a response which we can intercept. In the case of Value Format we get the following information:

  • Number of data sets
  • Data type (e.g. 8 bit)
  • Total figures
  • Decimals (if any)

With this information we should have everything we need to setup our combined input(s).

Setup

For combined input(s) the setup requires several messages.

Firstly we must lock the device to avoid subsequent steps from being treat as a single input setup. This is done using a Port Input Format Setup (Combined) message with the Lock LPF2 Device for setup sub-command.

Then, for each mode we wish to combine we need to send the Port Input Format Setup (Single) as detailed above.

Before we unlock the device we need to configure how the data sets will be delivered using another Port Input Format Setup (Combined) message, this time with the SetModeDataSet combination(s) sub-command.

This includes the combination mode we wish to use along with an ordered mapping of modes and data sets that we wish to consume.

An example payload could be:

  • 9 = Message Length
  • 0 = Hub Id
  • 66 = Message Type : Port Input Format Setup (Combined)
  • 0 = Port #
  • 1 = Sub-Command : SetModeDataSet combination(s)
  • 0 = Combination Mode Index
  • 17 = Mode/DataSet[0] (1/1)
  • 33 = Mode/DataSet[1] (2/1)
  • 29 = Mode/DataSet[2] (3/1)

Note: This should trigger a response message to acknowledge the command but I do not receive anything currently. Issue logged here in GitHub.

Finally, the device is unlocked using a third Port Input Format Setup (Combined) message with either UnlockAndStartWithMultiUpdateEnabled or UnlockAndStartWithMultiUpdateDisabled sub-commands.

Routines

Routines are simply a way to encapsulate reusable scripts into classes that can be run against devices and optionally awaited.

A good example of a routine is range calibration. By encapsulating the routine we can just apply it to as many devices as required any use constructor parameters for configuring the routine.

A routine has start and stop conditions which allow us to create iterative routines that are designed to repeat steps a number of times before completing.

It’s also possible to make the start and/or stop conditions dependent on the state of the device. For example, you could have a routine that stopped once the Speed dropped to zero etc.

Next Steps

I am keen to complete the combined input(s) setup once I have resolved the issue in GitHub. That will allow me to simplify the range calibration routine and start to create additional routines that are more dynamic and intelligent.

I also want to introduce a mechanism to relate control interfaces with commands and routines but before that I will probably need to implement a message buffer in the SDK to ensure that we can throttle downstream messages based on the limitations of the hubs capacity to process them.
C# SDK for LEGO Bluetooth (LE) Hubs

Tl;dr See the source code (and contribute) on Github.

LEGO & Bluetooth (LE)

LEGO have a new standard for communicating over Bluetooth (Low Energy) with compatible smart hubs that is documented here. The documentation is not being kept up to date but there is enough information there to fill in the gaps using a bit of trial and error.

Some of the older powered components use a different protocol and/or wiring specification. It is not the purpose of this post to document compatibility. I will detail any components I used during my development however.

Project Goal

The specification provides a good amount of detail but there are presently no C# SDKs to allow me to connect to a LEGO hub and control its connected devices remotely using a high level API.

As an example, I would like to be able to do the following…


using (var connectionManager = new BluetoothLEConnectionManager())
{
var connectionA = await connectionManager.FindConnectionById("BluetoothLE#BluetoothLEb8:31:b5:93:3c:8c-90:84:2b:4d:d2:62");
var connectionB = await connectionManager.FindConnectionById("BluetoothLE#BluetoothLEb8:31:b5:93:3c:8c-90:84:2b:4e:1b:dd");
var hubA = new TechnicSmartHub(connectionA);
var hubB = new TechnicSmartHub(connectionB);
// wait until connected
await hubA.Connect();
await hubB.Connect();
// wait until all 3 motors are connected to Hub A
var leftTrack = await hubA.PortA<TechnicMotorXL>();
var rightTrack = await hubA.PortB<TechnicMotorXL>();
var turntable = await hubA.PortD<TechnicMotorL>();
// wait until all 4 motors are connected to Hub B
var primaryBoom = await hubB.PortA<TechnicMotorXL>();
var secondaryBoom = await hubB.PortB<TechnicMotorL>();
var tertiaryBoom = await hubB.PortC<TechnicMotorL>();
var bucket = await hubB.PortD<TechnicMotorL>();
// sequentially calibrate each linear actuator using a torque based range calibration routine
await primaryBoom.RunRoutine(new RangeCalibrationRoutine(50));
await secondaryBoom.RunRoutine(new RangeCalibrationRoutine(50));
await tertiaryBoom.RunRoutine(new RangeCalibrationRoutine(40));
await bucket.RunRoutine(new RangeCalibrationRoutine(35));
// move forwards for 5 seconds
leftTrack.SetSpeedForDuration(50, 100, RotateDirection.Clockwise, 5000);
rightTrack.SetSpeedForDuration(50, 100, RotateDirection.CounterClockwise, 5000);
await Task.Delay(5000);
// rotate boom for 3 seconds
turntable.SetSpeedForDuration(100, 100, RotateDirection.CounterClockwise, 3000);
await Task.Delay(3000);
// reposition boom
primaryBoom.SetSpeedForDuration(100, 100, RotateDirection.Clockwise, 3000);
secondaryBoom.SetSpeedForDuration(75, 100, RotateDirection.CounterClockwise, 3000);
tertiaryBoom.SetSpeedForDuration(100, 100, RotateDirection.CounterClockwise, 2000);
await Task.Delay(3000);
// lift bucket
bucket.SetSpeedForDuration(50, 100, RotateDirection.Clockwise, 2000);
}

view raw

Example.cs

hosted with ❤ by GitHub

I want to abstract the SDK from the connection so that I can distribute the Core as a .NET Standard package that can be used by different application types (e.g. UWP or Xamarin).

It should be possible to interact at a low level issuing commands in a procedural manner but provide an opportunity to eventually register additional information about the model being controlled so that more intelligent instructions can be executed using calibrated constraints and synchronized ports etc.

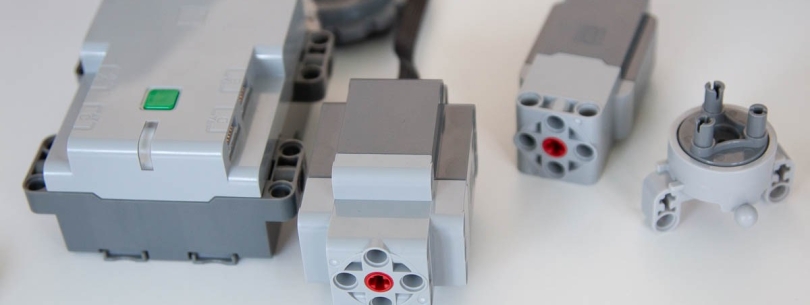
For this project I used the LEGO Technic set: Liebherr R 9800 (41200). It comes bundled with:

  • 2 x LEGO Technic Smart Hub (6142536)
  • 4 x LEGO Technic Motor L (6214085)
  • 3 x LEGO Technic Motor XL (6214088)

A Control+ application provides connectivity with the model but isn’t extensible or compatibility with custom builds. Other applications provide basic programming capabilities using arrangements of blocks but this will be the only C# SDK to provide more control to users without being dependent on iOS or Android app support.

Functional Overview

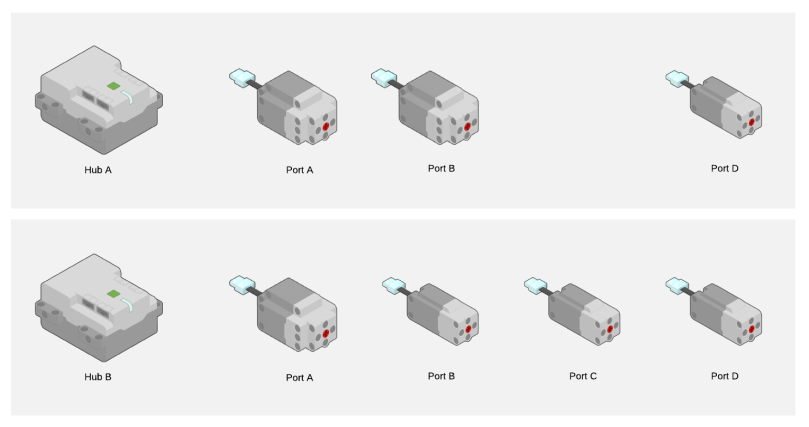
Based on the model referenced above, the Control+ components are connected as below:

41200 Configuration

Each Hub/Port controls different aspects of the model as follows:

  • Hub A
    • Port A : Left track
    • Port B : Right track
    • Port D : Turntable
  • Hub B
    • Port A : Primary Boom
    • Port B : Secondary Boom
    • Port C : Tertiary Boom
    • Port D : Bucket

SDK Types

In order to facilitate interop between the SDK and the remote hubs we will have the following types:

IConnection

This interface abstracts the BluetoothLE device connection from the SDK so that it can be used to subscribe to notifications and to read or write values without us being tightly coupled to a specific implementation (e.g. UWP).

Each IConnection has a one to one relationship with a BluetoothLE device based on the device ID.

IMessage

An IMessage is a byte[] that encapsulates all IO communication between the physical hub and the derived Hub class(es). Different concrete implementations provide strongly typed properties (usually enums) to make the interop more readable and to simplify parsing the byte streams.

Hub

This is an abstract class that all specific Hubs must implement and it encapsulates the interactions between the Hub and its assigned IConnection.

A Hub is responsible for taking actions based on messages it received from the IConnection and for writing values based on any outbound IMessage the Hub produces.

Device

This represents anything which can be connected to the Hub either by a physical port (e.g. Motor) or a virtual port (e.g. Internal sensor).

Each concrete implementation of a Device must correspond with an IODeviceType enum value since the Hub will be responsible for instantiating a Device and assigning it to a port.

Devices can produce messages and extensions expose convenience methods based on composition interfaces (e.g. IMotor).

Video Example

More Information

For the source code, please see the Github repo: https://github.com/Vouzamo/Lego

If anyone would like to become a contributor that would be much appreciated as this will be the communication standard for all LEGO hubs moving forward and I would like to get this working for all the potential hubs and devices available.

Other enhancement could include:

  • Registration of control components to for real-time user input.
  • Registration of virtual components for real-time API input (e.g. RESTful).
  • Registration of device constraints to manage calibration for absolute extremes to constrain what commands can be sent to the hub for a given port/device.
  • Registration of device commands that should be invoked based on Hub state or incoming IMessage conditions.


Project Grid

This is part of a series of posts on Project Grid.

  1. Project Grid
  2. ThreeJS : Getting Started with ThreeJS
  3. ThreeJS : Creating a 3D World
  4. ThreeJS : Heads Up Display

Conceptual Overview

This is a multi-part series of blog posts on a project to create a web application providing a new way to organize and visualize content. The idea is to map the url – particularly the path, into grids that can contain different types of content. The content can be found based on its location (e.g. /something/something-else/?x=100&y=-250&z=300) which corresponds to a grid called “something-else” existing within another grid called “something” and at the 3D co-ordinate location [100,-250,300].

As such, out web application will render a visualization of 3D space in the browser and provide controls for navigating within that space as well as controls to travel between grids (navigation up and down the request path). It will also provide a way to visualize different types of content that can exist within a grid such as images, video, audio etc. These content types will be extensible so that new types can be added in the future.

This concept would provide a way to store a vast amount of content which can be consumed in a familiar and intuitive way. We can also provide features to help users locate content within grids that manipulate the 3D world to either transport the user to particular locations or to temporarily transport the content to them. Imagine for example being able to create a gravitational object that only affected content of a certain type within the current grid so that images, for example, were attracted to the users current location in 3d space temporarily.

Technology Stack

For this project, I will be building a REST service in ASP.NET Core that will use a document database to store the content that exists within a grid along with views to query that data based on the top level grid (e.g. the host), the specific grid (e.g. the path), and the co-ordinates (e.g. the query string).

The user interface will use WebGL for the 3D visualization and be implemented as a responsive experience. The interface will be optimized for desktop initially but the long term goal would be for this interface to work well across all devices that have a web browser and support WebGL so gesture support will be considered throughout.

Proof of Concept

This concept is an evolution of a previous 2D implementation which can be found here. You can tap items to interact with them or hold items to move them within the grid. Most items are grid links so you’ll notice that whilst at the root of the web application (/) there is a “Home” item at [0,0] that has no action whilst within a child grid (/contacts) there is a “Back” action at [0,0] that allows you to visit the parent grid – climbing up the path of the web application.

The source code for this 2D proof of concept can be found on GitHub.


The Specification Pattern

What is a Specification?

One of my favorite software development patterns is the specification pattern. This pattern provides a way of encapsulating business logic and helps to enforce the DRY principle.

As always with such things, a contrived example helps articulate the concept…

In a commerce system there are visitors and the business defines an active visitor as having used the system within the last 7 days and having placed an order within the last 30 days.

The specific logic is arbitrary. What is important is that we need to be able to define active visitors in numerous locations throughout our application and, should the business change their definition of an active visitor, we should be able to reflect the change in a single place within our code.

Enter the specification pattern which can be represented by the following interface:

public interface ISpecification<in T>
{
    bool IsSatisfiedBy(T subject)
}

Assuming we have services for checking system usage and order history we can implement this interface for our visitor example.

public class ActiveVisitorSpecification : ISpecification<Visitor>
{
    protected IUsageService Usage { get; set; }
    protected IOrderService Orders { get; set; }

    public ActiveVisitorSpecification(IUsageService usage, IOrderService orders)
    {
        Usage = usage;
        Orders = orders;
    }

    public bool IsSatisfiedBy(Visitor subject)
    {
        if(Usage.HasUsedInLastSevenDays(subject) && Orders.LatestOrderDaysAgo(subject) <= 30)
        {
            return true;
        }

        return false;
    }
}

As you can see from the example, we have encapsulated all the business logic within a single place and can now use this class throughout our application whenever we need to check if a visitor can be considered as being active.

// Get visitor
var customers = context.Visitors.Find(id);

// Initialize specification
var specification = new ActiveVisitorSpecification(usageService, orderService);

// Apply specification
if(specification.IsSatisfiedBy(c))
{
    // Do something with active visitor
}

Chaining multiple specifications

Whilst it’s great to encapsulate the business logic for active visitors within a single class, we might have been a little hasty. We didn’t stop to consider that the business has business logic to define other visitor groups such as recent visitors and recent customers.

The business defines a recent visitor as having used the system within the last 7 days and a recent customer as having placed an order within the last 30 days.

We can create a specification for each of these examples but now we are duplicating business logic across specifications instead. Still better than across the entire application but not a great improvement from what we originally had.

Instead we can use chaining to create discrete specifications for each of the specific examples and chain them together for the original definition of an active visitor being both a recent visitor and a recent customer.

Chaining is achieved by creating specifications that can apply boolean logic to other specifications. They implement the IsSatisfiedBy method just as before but their implementation is based on && (and), || (or), or ! (not) logic.

AndSpecification

public class AndSpecification<T> : ISpecification<T>
{
    protected ISpecification<T> Left { get; set; }
    protected ISpecification<T> Right { get; set; }

    public AndSpecification(ISpecification<T> left, ISpecification<T> right)
    {
        Left = left;
        Right = right;
    }

    public bool IsSatisfiedBy(T subject)
    {
        return Left.IsSatisfiedBy(subject) && Right.IsSatisfiedBy(subject);
    }
}

As you can see above, the implementation is very straightforward. It just checks if both the left AND right specifications are satisfied by the subject.

OrSpecification

public class OrSpecification<T> : ISpecification<T>
{
    protected ISpecification<T> Left { get; set; }
    protected ISpecification<T> Right { get; set; }

    public OrSpecification(ISpecification<T> left, ISpecification<T> right)
    {
        Left = left;
        Right = right;
    }

    public bool IsSatisfiedBy(T subject)
    {
        return Left.IsSatisfiedBy(subject) || Right.IsSatisfiedBy(subject);
    }
}

Once again, the implementation is very straightforward. It just checks if either the left OR right specifications are satisfied by the subject.

NotSpecification

public class NotSpecification<T> : ISpecification<T>
{
    protected ISpecification<T> Not { get; set; }

    public NotSpecification(ISpecification<T> not)
    {
        Not = not;
    }

    public bool IsSatisfiedBy(T subject)
    {
        return !(Not.IsSatisfiedBy(subject));
    }
}

This one is a little different as it simply checks that the specification is NOT satisfied by the subject.

Syntactic Sugar

Whilst this provides us a mechanism to chain multiple specifications together to create more complicated ones it isn’t pretty to instantiate these specifications – especially when nesting them within each other.

We can use static extension methods to add some syntactic sugar and make these really easy to use.

For example, for the AndSpecification we could have the following extension method:

public static ISpecification<T> And<T>(this ISpecification<T> left, ISpecification<T> right)
{
    return new AndSpecification<T>(left, right);
}

Now, we can replace our original ActiveVisitorSpecification with the following:

var recentVisitor = new RecentVisitor(usageService);
var recentCustomer = new RecentCustomer(orderService);
...
var activeVisitor = recentVisitor.And(recentCustomer);

We can even take it a step further and expose composite specifications (specification that are constructed by chaining others) within static methods so that we don’t duplicate the chaining in multiple places.

As with any pattern, the application of it depends on the individual developer.

Linq and IQueryable

The observant among you will have noticed that, whilst this is fine when we are dealing with individual customers, there may be times when we want to use a specification as a predicate for multiple customers.

This can be achieved by extending our original ISpecification<in T> interface.

public interface IWhereSpecification<T> : ISpecification<T>
{
    Expression<Func<T, bool>> Predicate { get; }
    IQueryable<T> SatisfiesMany(IQueryable<T> queryable);
}

A Predicate property exposes an expression that describes the specification using a predicate function whilst a new SatisfiesMany method takes an IQueryable<T> and returns an IQueryable<T> after having applied the specification.

Below is an abstract implementation of this interface:

public abstract class WhereSpecification<T> : IWhereSpecification<T>
{
    private Func<T, bool> _compiledExpression;
    private Func<T, bool> CompiledExpression { get { return _compiledExpression ?? (_compiledExpression = Predicate.Compile()); } }
    public Expression<Func<T, bool>> Predicate { get; protected set; }

    public bool IsSatisfiedBy(T subject)
    {
        return CompiledExpression(subject);
    }

    public virtual IQueryable<T> SatisfiesMany(IQueryable<T> queryable)
    {
        return queryable.Where(Predicate);
    }
}

Any subsequent concrete implementations can simply set the Predicate property.

We can also chain the specifications together as before by using a BinaryExpression when defining the subsequent predicate.

Now, when dealing with an IQueryable<T> you can reduce it using a specification and if you are using LINQ to SQL (e.g. Entity Framework) then the expression will be converted to a query meaning that you are only requesting a subset of data from SQL instead of requesting everything and reducing it in-memory.

Download from NuGet

If you want to use an existing implementation of the specification pattern you can do so by adding the Vouzamo.Specification NuGet package to your project.

Additionally, you can review the source on GitHub.

Web Components with ASP.NET Core 1.0

What are HtmlHelpers and TagHelpers?

With ASP.NET Core 1.0 comes MVC 6, and with the latest MVC framework there is a transition from HtmlHelpers to TagHelpers.

For those who aren’t familiar with HtmlHelpers, have a look in any MVC5 implementation and you’ll likely see:

@using(Html.BeginForm())
{
    ...
}

Anything beginning with @Html. is invoking a static extension method on a C# HtmlHelper class that resides within the System.Web.MVC namespace. HtmlHelpers are a really useful way to abstract logic away and avoid unnecessary duplication of mark-up within your views.

TagBuilders provide a similar abstraction but rather than rely upon the @Html. invocation they are implemented as tags – either by extending existing mark-up elements (such as <form>) or creating new ones (e.g. <custom-map>).

For an overview of TagHelpers see: https://docs.asp.net/en/latest/mvc/views/tag-helpers/intro.html

What are Web Components

Web components are custom DOM elements that encapsulate mark-up, styling, and JavaScript to be reused across multiple web sites. There are a number of different web component frameworks built against a common set of standards. One such example is Google Polymer.

Google Polymer also provide a number of prebuilt components in their Element Catalog.

screen2bshot2b2015-05-292bat2b11-02-192bpm

You can use existing elements as is, combine elements to create new ones by composition, or create custom elements from scratch.

How can a TagHelper be used with Polymer?

Let’s take an existing Polymer web component as an example. Google provide the google-map to add a map to your web page(s):

<google-map latitude="37.77493" longitude="-122.41942" fit-to-markers>

This is great if you have the latitude and longitude for a map available in your view model but what if you only want to expose the unique identifier of an address in your view and use a service to provide the latitude and longitude values?

One of the limitations of HtmlHelpers was the fact that they were static extension methods and as such didn’t compliment dependency injection. This often resulted in abusing the ViewData or TempData dictionaries that MVC provides to pass services into a view and subsequently into HtmlHelper(s) as a parameter.

TagHelpers are NOT static and are ideally suited to dependency injection meaning that you can combine the readability benefits of a HtmlHelper with the enforcement of single responsibility and dry principles (and testability) that dependency injection provide.

Creating a TagHelper

To create a new TagHelper you need to create a class decorated with a [HtmlTargetElement] attribute which is used to set the element/tag name and any required attributes. You can decorate properties with a [HtmlAttributeName] attribute to have them auto populated.

Dave Paquette has provided an excellent blog post on creating a custom TagHelper.

Note: Optional element/tag attributes can be omitted from the [HtmlTargetElement] attribute.

[HtmlTargetElement("custom-map", Attributes = AddressIdAttributeName)]
public class CustomMapTagHelper : TagHelper
{
    private const string AddressIdAttributeName = "address-id";

    private IAddressService AddressService { get; set; }
    [HtmlAttributeName(AddressIdAttributeName)]
    public string AddressId { get; set; }
 
    public CustomMapTagHelper(IAddressService addressService)
    {
        AddressService = addressService;
    }
 
    ...
}

Here, I have used constructor injection to wire up a dependency on IAddressService. This is a service that has a method called ResolveLocation that takes a string addressId and returns a LatLong:

public interface IAddressService
{
    LatLong ResolveLocation(string addressId)
}

public struct LatLong
{
    public double Latitude { get; set; }
    public double Longitude { get; set; }
}

Finally, you need to override the Process or ProcessAsync method of TagHelper and provide your implementation:

public override void Process(TagHelperContext context, TagHelperOutput output)
{
    var latlong = AddressService.ResolveLocation(AddressId);
 
    string content = $"<google-map latitude=\"{latlong.Latitude}\" longitude=\"{latlong.Longitude}\" fit-to-markers>";

    output.Content.AppendHtml(content);
}

We can reference our custom tag helper using the @addTagHelper Razor command. We can do this within the .cshtml templates we want to use it or make it available to all templates by adding it to our _GlobalImports.cshtml.

We can use the tag with the following mark-up:

<custom-map address-id="@Model.AddressId"></custom-map>

The above tag will render the following mark-up (with the latitude and longitude attributes dynamically populated):

<custom-map address-id="@Model.AddressId">
    <google-map latitude="37.77493" longitude="-122.41942" fit-to-markers>
</custom-map>

Benefits Recap

By using a TagHelper to generate the mark-up you have a single place to maintain it. Any future requirements that involve changing the way maps can be dealt with once rather than crawling through all the views and changing it manually.

Additionally we have reduced the effort required to re-use the custom-map element across our web application and reduced the potential for typographical mistakes.

Next Steps

This is a particularly simple (and contrived) example but you can use the same mechanism for lots of scenarios.

You should consider the following…

  1. How to replace the <custom-map> element with a <google-map>?
  2. How to toggle the fit-to-markers attribute?
  3. What if the AddressService throws an Exception? How to deal with failures.