This is part of a series of posts on Project Grid.
- Project Grid
- ThreeJS : Getting Started
- ThreeJS : Creating a 3D World
- ThreeJS : Heads Up Display
I would urge you to read the previous blogs in this series if you haven’t already done so. But, if you are impatient (like me) then you can download the source code so far from Google Drive.
Fundamentals of 3D
This post is going to assume a basic knowledge of 3D terminology. Some basic definitions are below but I would encourage some additional reading if you aren’t already familiar.

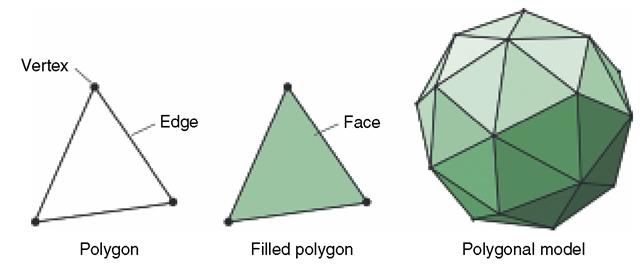
- Vertex (pl: vertices) – An individual point.
- Edge – A vectors connecting 2 vertices.
- Face – A sequence of edges to describe a polygon.
- Polygon – A sequence of 3 or more edges to describe a face that resides on a single plane.
- Vector – a direction combined with a magnitude represented using Cartesian coordinates.
Perspective Point Cloud
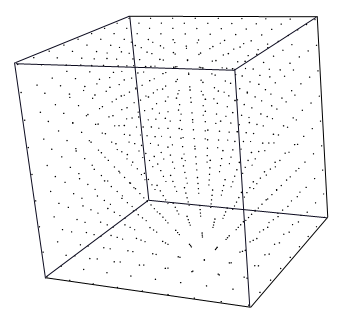
A point cloud is a particle system where each particle is part of the same geometric structure. A collection of multiple points in 3D space that can be represented by vertices without any edges connecting them to each other. The points can move by changing the coordinates for their specific vertex or the cloud can be moved by changing the position of the collective geometry.
We are going to create a point cloud that will be used to help orientate our camera in 3D space. As we move around the point cloud will give us some perspective of how we are moving relative to the stationary points.
In ThreeJs a point cloud depends upon some geometry and a material. We will be using the PointsMaterial since we want to be able to render each point individually with a texture. We are going to distribute the vertices of our point cloud over a cube that contains our camera.

Add the following function:
function initPointCloud() {
    var points = new THREE.Geometry();
    var material = new THREE.PointsMaterial({
        color: 0xffffff,
        size: 0.1,
        map: new THREE.TextureLoader().load('textures/particle.png'),
        transparent: true,
        alphaTest: 0.5
    });

    var size = 15;

    for (var x = -size; x <= size; x++) {
        for (var y = -size; y <= size; y++) {
            for (var z = -size; z <= size; z++) {
                var point = new THREE.Vector3(x, y, z);
                points.vertices.push(point);
            }
        }
    }

    particleSystem = new THREE.Points(points, material);
    sceneMain.add(particleSystem);
}
Note: Ensure you have a suitable texture to load using the TextureLoader and that the path is correct. You can download my example texture from Google Drive.
Ensure you are calling the initPointCloud function from your init function. You should be able to run your code and navigate the scene using WASD to move and mouse click and drag to look around.
This looks pretty cool and helps us orientate ourselves but we can very quickly move beyond the range of the point cloud. What we need to do it to allow it to move with the camera but in such a way that we still feel like we are moving relative to it.
Animating the Scene
Our camera is able to move in 3D space and can be at any theoretical coordinates. We can represent our coordinates in the format [x,y,z] where x is our position along the x-axis, y along the y-axis, and z along the z-axis. Our camera can move gradually from one position to another. As it moves it will be at various positions such as [0.31, 1.57, -7.32] etc.
Our point cloud is stationary at position [0,0,0] and has vertices at various integer positions such as [1,2,3]. If we want to ensure that the point cloud moves with our camera we can simply update the position of the geometry within our animate function.
To retain the perspective of moving within the point cloud we must only update the point cloud within integer increments as the camera moves beyond a threshold, otherwise it will appear to be stationary relative to the camera.
Add the following function:
function updatePointCloud() {
    var distance = cameraPerspective.position.distanceTo(particleSystem.position);

    if (distance > 2) {
        var x = Math.floor(cameraPerspective.position.x);
        var y = Math.floor(cameraPerspective.position.y);
        var z = Math.floor(cameraPerspective.position.z);

        particleSystem.position.set(x, y, z);
    }
}
This function will check for the magnitude distance between the main camera and the point cloud. When it exceeds a threshold of 2 (in any direction), the point cloud position will be updated with the nearest integer coordinates to the camera. This will be a seamless change the the user because all the visible points will be rendered in exactly the same positions.
Ensure you are calling the updatePointCloud function from your animate function (before renderScenes). Now, if you run your code again, you should get the same effect as before but you’ll not be able to move outside the range of the point cloud.
Add Some Points of Interest
Okay, we have a scene, a camera, and a point cloud that gives us perspective when moving. Now we need something to represent the data we want to show later on. I am going to use a colored sphere as I will revisit later to customize the geometry and material based on the data.
Until we have a service that can provide the data that should be added to the scene I will just generate some randomly.
Add the following functions:
function initData() {
    itemGroup = new THREE.Group();

    var geometry = new THREE.SphereGeometry(0.1, 32, 32);
    var material = new THREE.MeshBasicMaterial({ color: 0xff0000, wireframe: true, transparent: true, opacity: 0.5 });

    for (var i = 0; i < 15; i++) {
        var x = getRandom(-20, 20);
        var y = getRandom(-20, 20);
        var z = getRandom(-20, 20);

        var data = new THREE.Mesh(geometry, material);
        data.position.set(x, y, z);

        itemGroup.add(data);
    }

    sceneMain.add(itemGroup);
}

function getRandom(min, max) {
    var min = Math.ceil(min);
    var max = Math.floor(max);

    return Math.floor(Math.random() * (max - min)) + min;
}
This function creates a new group with 15 points of interest. Each point of interest is positioned randomly between -20 and 20 on each axis. Ensure you are calling the initData function from your init function.
A sphere looks okay but it’s much more interesting whilst rotating. Add the following function:
function updateData() {
    itemGroup.children.forEach(function(data) {
        data.rotation.x += 0.01;
        data.rotation.y += 0.01;
        data.rotation.z += 0.01;
    });
}
Ensure you are calling the updateData function from your animate function (before renderScenes). If you run the code you’ll be able to navigate your scene to find each of the 15 points of interest.
Next Steps
Whilst we can navigate our scene and find the points of interest, it is difficult to keep track of where they are relative to your current position – especially when they are far away as they are not visible over a certain distance.
In the next post we will add some HUD (heads up display) features to track the points of interest and provide a visual indicator of their position relative to ours. If you want to download an example of what we have created so far you can do so from Google Drive.
