ThreeJS : Heads Up Display

This is part of a series of posts on Project Grid.

  1. Project Grid
  2. ThreeJS : Getting Started
  3. ThreeJS : Creating a 3D World
  4. ThreeJS : Heads Up Display
  5. ASP.NET Core & Azure DocumentDB: Modeling the Domain

I would urge you to read the previous blogs in this series if you haven’t already done so. But, if you are impatient (like me) then you can download the source code so far from Google Drive.

What is a HUD?

A HUD (or heads up display) is a 2D user interface that overlays our 3D scene and provides useful information to help us interact with the geometry.

We facilitate a HUD by having a second scene (sceneHud) in which we can manage our HUD objects and an orthographic camera (cameraOrthographic) to render them in 2 dimensions.

 function renderScenes() {
     renderer.clear();
     renderer.render(sceneMain, cameraPerspective);
     renderer.clearDepth();
     renderer.render(sceneHud, cameraOrthographic);
 }

In the above code you can see we have been rendering our sceneHud all along but since it doesn’t contain anything yet, there is nothing visual as a result.

Populating Our HUD

Our HUD is going to be responsible for rendering a 2D projection of pointers to some tracked 3D objects from sceneMain.

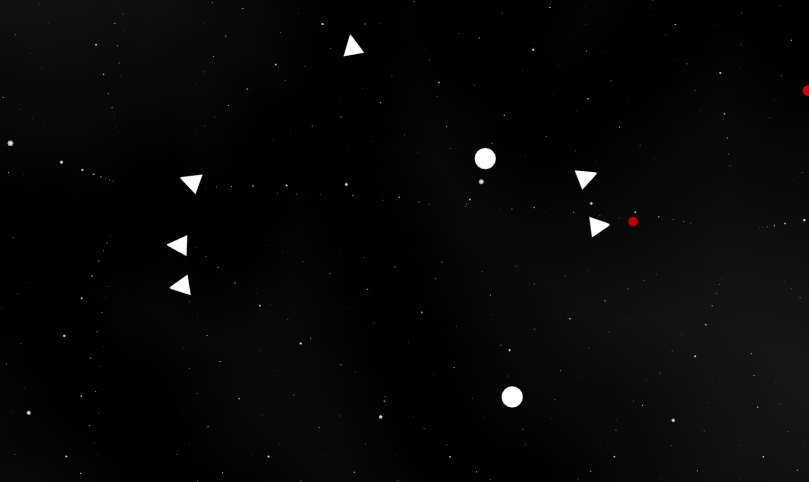
We want to project an imaginary circle onto our HUD and render a cone over each tracked object. If the tracked object falls inside the imaginary circle, we can orientate it towards the camera to render a circular silhouette. Otherwise, we can orientate it to point towards its target object and position it on the circumference of our imaginary circle. Additionally, we are going to ignore any tracked objects that are behind the near clipping plane of our perspective camera.
grid-hud

This should give us something like the image above where we have a combination of spheres and cones to track objects and help us navigate towards them.

Note: In the future we will likely replaces the spheres that overlay tracked objects within the 2D projected circle with some identifying information instead.

Adding Objects to the HUD

The first stage is to create a new THREE.Group to manage the HUD objects and a THREE.Mesh for each cone.

Add the following functions:

function initHudData() {
    hudGroup = new THREE.Group();

    sceneHud.add(hudGroup);
}

function addHudData(trackedItem) {
    var hudGeometry = new THREE.ConeGeometry(0.1, 0.2, 16);
    hudGeometry.rotateX(Math.PI * 0.5);
    var hudMaterial = new THREE.MeshPhongMaterial({ color: 0xffffff, side: THREE.DoubleSide });

    var hudData = new THREE.Mesh(hudGeometry, hudMaterial);

    hudData.scale.set(200, 200, 200);
    hudData.visible = false;
    hudData.tracked = trackedItem;
    
    hudGroup.add(hudData);
}

You’ll need to ensure you call the initHudData function from within your initSceneHud function but now, when creating your items in the initData function you can track them by calling the addHudData function and passing the data.

function initData() {
    ...
    for (var i = 0; i < 15; i++) {
        ...
        addHudData(data);

        itemGroup.add(data);
    }
    sceneMain.add(itemGroup);
}

Note: You won’t be able to see anything yet because we set the visible property of the HUD objects to false when we initialized them.

Animating the HUD Objects

We will need to update the visibility and orientation of each of our HUD objects based on the orientation of the camera and the position of items in the sceneMain relative to the camera.

We need to iterate over each HUD object and check if it is in front of the near clipping plane of the cameraPerspective. This will determine the visibility of each respective HUD object.

Add the following functions:

function checkCameraPlane(obj, camera) {
    var cameraDirection = camera.getWorldDirection();
    var objectDirection = new THREE.Vector3(0, 0, 0);
    objectDirection.subVectors(obj.position, camera.position);

    return cameraDirection.dot(objectDirection) >= 0;
}

function findHudPosition(obj, camera) {
    var vector = new THREE.Vector3();

    obj.updateMatrixWorld();
    vector.setFromMatrixPosition(obj.matrixWorld);
    vector.project(camera);

    vector.x *= (screenWidth / 2);
    vector.y *= (screenHeight / 2);
    vector.z = 1;

    return vector;
}

The checkCameraPlane function will determine the dot product for a vector representing the orientation of the camera and a vector between the camera and an object. If the dot product is greater than or equal to zero, we can consider the object to be in front of the camera.

The findHudPosition function will project a 3D perspective world position to a 2D orthographic screen position.

Add the following function:

function updateHudData() {
    var centerPoint = new THREE.Vector3(0, 0, 1);

    hudGroup.children.forEach(function (data) {
        var target = data.tracked;

        if (checkCameraPlane(target, camera)) {
            var position = findHudPosition(target, camera);
            
            if (position.distanceTo(centerPoint) <= 400) {
                data.lookAt(cameraOrthographic);
            } else {
                data.lookAt(position);
                position.clampLength(0, 400);
            }

            data.position.set(position.x, position.y, position.z);
            data.visible = true;
        } else {
            data.visible = false;
        }
    });
}

We need to ensure our updateHudData function is called from our animate function after we call our updateData function.

If you run your code now, you should the HUD items should be rendered and will point towards their respective tracked objects (or the camera when within the imaginary circle).

Resources

You can see a working version here.

You can watch a video on YouTube.

You can see the source code on GitHub or download a working example from Google Drive.

What Next?

We are just generating random data for our scene and it is not persistent. In the next post we’ll be using ASP.NET Core and Azure DocumentDB to create a data driven REST API that will provide the data for our Grid.

ThreeJS : Creating a 3D World

This is part of a series of posts on Project Grid.

  1. Project Grid
  2. ThreeJS : Getting Started
  3. ThreeJS : Creating a 3D World
  4. ThreeJS : Heads Up Display

I would urge you to read the previous blogs in this series if you haven’t already done so. But, if you are impatient (like me) then you can download the source code so far from Google Drive.

Fundamentals of 3D

This post is going to assume a basic knowledge of 3D terminology. Some basic definitions are below but I would encourage some additional reading if you aren’t already familiar.

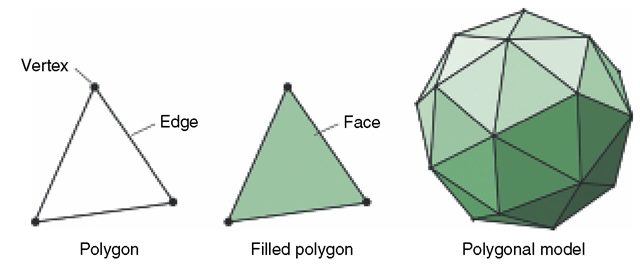
3D fundamentals

  • Vertex (pl: vertices) – An individual point.
  • Edge – A vectors connecting 2 vertices.
  • Face – A sequence of edges to describe a polygon.
  • Polygon – A sequence of 3 or more edges to describe a face that resides on a single plane.
  • Vector – a direction combined with a magnitude represented using Cartesian coordinates.

Perspective Point Cloud

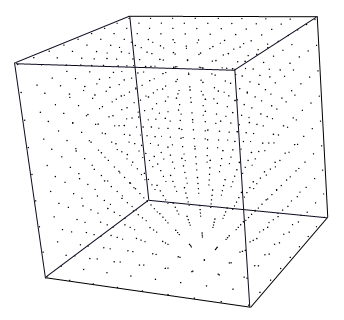
A point cloud is a particle system where each particle is part of the same geometric structure. A collection of multiple points in 3D space that can be represented by vertices without any edges connecting them to each other. The points can move by changing the coordinates for their specific vertex or the cloud can be moved by changing the position of the collective geometry.

We are going to create a point cloud that will be used to help orientate our camera in 3D space. As we move around the point cloud will give us some perspective of how we are moving relative to the stationary points.

In ThreeJs a point cloud depends upon some geometry and a material. We will be using the PointsMaterial since we want to be able to render each point individually with a texture. We are going to distribute the vertices of our point cloud over a cube that contains our camera.

point cloud

Add the following function:

function initPointCloud() {
    var points = new THREE.Geometry();
    var material = new THREE.PointsMaterial({
        color: 0xffffff,
        size: 0.1,
        map: new THREE.TextureLoader().load('textures/particle.png'),
        transparent: true,
        alphaTest: 0.5
    });

    var size = 15;

    for (var x = -size; x <= size; x++) {
        for (var y = -size; y <= size; y++) {
            for (var z = -size; z <= size; z++) {
                var point = new THREE.Vector3(x, y, z);
                points.vertices.push(point);
            }
        }
    }

    particleSystem = new THREE.Points(points, material);
    sceneMain.add(particleSystem);
}

Note: Ensure you have a suitable texture to load using the TextureLoader and that the path is correct. You can download my example texture from Google Drive.

Ensure you are calling the initPointCloud function from your init function. You should be able to run your code and navigate the scene using WASD to move and mouse click and drag to look around.

This looks pretty cool and helps us orientate ourselves but we can very quickly move beyond the range of the point cloud. What we need to do it to allow it to move with the camera but in such a way that we still feel like we are moving relative to it.

Animating the Scene

Our camera is able to move in 3D space and can be at any theoretical coordinates. We can represent our coordinates in the format [x,y,z] where x is our position along the x-axis, y along the y-axis, and z along the z-axis. Our camera can move gradually from one position to another. As it moves it will be at various positions such as [0.31, 1.57, -7.32] etc.

Our point cloud is stationary at position [0,0,0] and has vertices at various integer positions such as [1,2,3]. If we want to ensure that the point cloud moves with our camera we can simply update the position of the geometry within our animate function.

To retain the perspective of moving within the point cloud we must only update the point cloud within integer increments as the camera moves beyond a threshold, otherwise it will appear to be stationary relative to the camera.

Add the following function:

function updatePointCloud() {
    var distance = cameraPerspective.position.distanceTo(particleSystem.position);

    if (distance > 2) {
        var x = Math.floor(cameraPerspective.position.x);
        var y = Math.floor(cameraPerspective.position.y);
        var z = Math.floor(cameraPerspective.position.z);

        particleSystem.position.set(x, y, z);
    }
}

This function will check for the magnitude distance between the main camera and the point cloud. When it exceeds a threshold of 2 (in any direction), the point cloud position will be updated with the nearest integer coordinates to the camera. This will be a seamless change the the user because all the visible points will be rendered in exactly the same positions.

Ensure you are calling the updatePointCloud function from your animate function (before renderScenes). Now, if you run your code again, you should get the same effect as before but you’ll not be able to move outside the range of the point cloud.

Add Some Points of Interest

Okay, we have a scene, a camera, and a point cloud that gives us perspective when moving. Now we need something to represent the data we want to show later on. I am going to use a colored sphere as I will revisit later to customize the geometry and material based on the data.

Until we have a service that can provide the data that should be added to the scene I will just generate some randomly.

Add the following functions:

function initData() {
    itemGroup = new THREE.Group();

    var geometry = new THREE.SphereGeometry(0.1, 32, 32);
    var material = new THREE.MeshBasicMaterial({ color: 0xff0000, wireframe: true, transparent: true, opacity: 0.5 });

    for (var i = 0; i < 15; i++) {
        var x = getRandom(-20, 20);
        var y = getRandom(-20, 20);
        var z = getRandom(-20, 20);

        var data = new THREE.Mesh(geometry, material);
        data.position.set(x, y, z);

        itemGroup.add(data);
    }

    sceneMain.add(itemGroup);
}

function getRandom(min, max) {
    var min = Math.ceil(min);
    var max = Math.floor(max);

    return Math.floor(Math.random() * (max - min)) + min;
}

This function creates a new group with 15 points of interest. Each point of interest is positioned randomly between -20 and 20 on each axis. Ensure you are calling the initData function from your init function.

A sphere looks okay but it’s much more interesting whilst rotating. Add the following function:

function updateData() {
    itemGroup.children.forEach(function(data) {
        data.rotation.x += 0.01;
        data.rotation.y += 0.01;
        data.rotation.z += 0.01;
    });
}

Ensure you are calling the updateData function from your animate function (before renderScenes). If you run the code you’ll be able to navigate your scene to find each of the 15 points of interest.

Next Steps

Whilst we can navigate our scene and find the points of interest, it is difficult to keep track of where they are relative to your current position – especially when they are far away as they are not visible over a certain distance.

In the next post we will add some HUD (heads up display) features to track the points of interest and provide a visual indicator of their position relative to ours. If you want to download an example of what we have created so far you can do so from Google Drive.

ThreeJS : Getting Started

This is part of a series of posts on Project Grid.

  1. Project Grid
  2. ThreeJS : Getting Started
  3. ThreeJS : Creating a 3D World
  4. ThreeJS : Heads Up Display

What are we going to build?

In my previous Project Grid post I discussed the concept of visualizing content within a 3d grid so I am going to build a 3d world space in which I can plot points, add some temporary controls to navigate world space, and some HUD (heads up display) functionality to help me find plotted points.

You can see a working example here.

I want to use WebGL to render the scene(s) and I will be using ThreeJS to build my scene(s). ThreeJS is a JavaScript library that provides a familiar and consistent way to build  scenes using JavaScript.

Setting the Scene

We can start by creating a new html page. We need to include a <script> for the ThreeJS library. For development / PoC purposes we can just link to the latest build (http://threejs.org/build/three.js) but for a production application you’d want to reference a specific versions and would likely self-host.

We’ll also want to create an in-line <script> element for our scene with some variables, an init function and an animate function.

You should now have something like this:

var container, screenWidth, screenHeight;
var sceneMain, sceneHud;
var cameraPerspective, cameraOrthographic;
var controls, renderer, clock;
var groupItems, particleItems, hudItems;

init();
animate();

function init() {

}

function animate() {

}

We are going to need a WebGL renderer. Add the following function:

function initRenderer() {
    renderer = new THREE.WebGLRenderer({
        antialias: true,
        alpha: true
    });

    renderer.setClearColor(0x000000, 0);
    renderer.autoClear = false; // We want to draw multiple scenes each tick
    renderer.setPixelRatio(window.devicePixelRatio);
    renderer.setSize(screenWidth, screenHeight);

    container.appendChild(renderer.domElement);
}

Next, we need to initialize our main scene and our HUD scene. Add the following functions:

function initSceneMain() {
    sceneMain = new THREE.Scene();
    sceneMain.fog = new THREE.Fog(0x000000, 1, 60);
}

function initSceneHud() {
    sceneHud = new THREE.Scene();
    sceneHud.add(new THREE.AmbientLight(0xffffff));
}

Now we have some scenes, we should create some cameras. Add the following function:

function initCameras() {
    cameraPerspective = new THREE.PerspectiveCamera(
        30,
        1600 / 900,
        0.1, 55
    );

    cameraOrthographic = new THREE.OrthographicCamera(
        1600 / -2,
        1600 / 2,
        900 / 2,
        900 / -2,
        1, 1000
    );
}

Note: Some of the parameters (1600 and 900) are arbitrary as we’ll be updating them after calculating the window dimensions anyway.

We are going to render the main scene with the perspective camera followed by the HUD scene with the orthographic camera. To do this, lets add a render function:

function renderScenes() {
    renderer.clear();
    renderer.render(sceneMain, cameraPerspective);
    renderer.clearDepth();
    renderer.render(sceneHud, cameraOrthographic);
}

Now we have a way to render our scenes we can wire it up from our existing animate function:

function animate() {
    requestAnimationFrame(animate); // This will handle the callback

    var delta = clock.getDelta();

    // Any changes to the scene will be initiated from here

    renderScenes();
}

All that remains is to wire up our existing init function:

function init() {
    container = document.createElement('div');
    document.body.appendChild(container);

    // We'll replace these values shortly
    screenWidth = 1600;
    screenHeight = 900;

    clock = new THREE.Clock();

    initRenderer();
    initCameras();
    initSceneMain();
    initSceneHud();
}

You should be able to test your scene now. It’s not very exciting but we haven’t added anything to it yet. Provided you aren’t getting any console errors, everything is working correctly (so far).

Creating a Background

For our 3d background we are going to use a skybox. A skybox is a very large cube with textures applied to the inside faces. Our camera and everything else it can see is inside this cube so those textures act as the background.

You will need 6 textures – 1 for each face of the cube. You can download my example textures from Google Drive. Add a folder for textures, and within, add another folder for skybox.

To create a skybox from the textures, add the following function:

function initSkybox(scene) {
    var skyboxPath = 'textures/skybox/';
    var skyboxFormat = 'png';

    var skyboxTextures = [
        skyboxPath + 'right.' + skyboxFormat,
        skyboxPath + 'left.' + skyboxFormat,
        skyboxPath + 'up.' + skyboxFormat,
        skyboxPath + 'down.' + skyboxFormat,
        skyboxPath + 'front.' + skyboxFormat,
        skyboxPath + 'back.' + skyboxFormat,
    ];

    var skybox = new THREE.CubeTextureLoader().load(skyboxTextures);
    skybox.format = THREE.RGBFormat;

    scene.background = skybox;
}

If you update your initSceneMain() function and add a function call for initSkybox(sceneMain) you should see a monochrome background in the browser. You should see something like this:

Grid Skybox

Note: You’ll need to serve the html page rather than just open it in the browser. If you try to use a file protocol ThreeJS will throw an CORS error when trying to load the texture(s).

Taking Control

We are going to use some ready made controls for ThreeJS to allow us to quickly navigate around in our scene. We can replace these later with our own custom controls. You’ll need to include another external script in your <head> for http://threejs.org/examples/js/controls/FlyControls.js.

Add a function for initializing the controls and binding them to our perspective camera:

function initControls(target) {
    controls = new THREE.FlyControls(target);
    controls.movementSpeed = 5;
    controls.rollSpeed = Math.PI / 12;
    controls.domElement = container;
    controls.dragToLook = true;
}

Add a function call for initControls(cameraPerspective) to your init function and update your existing animate function to update the controls:

function animate() {
    ...
    // Any changes to the scene will be initiated from here 
    controls.update(delta);
}

Now you can use mouse click / drag to look around within your scene. You can also use WASD to move but until you render something you’ll not be able to tell you’re moving yet.

Finishing Touches

We need to account for the window dimensions changing if a browser gets resized or if orientation changes on a mobile device. Add the following functions:

function initWindow() {
    screenWidth = window.innerWidth;
    screenHeight = window.innerHeight;

    renderer.setSize(screenWidth, screenHeight);
    resetCameras();
}

function resetCameras() {
    cameraPerspective.aspect = screenWidth / screenHeight;
    cameraPerspective.updateProjectionMatrix();

    cameraOrthographic.left = screenWidth / -2;
    cameraOrthographic.right = screenWidth / 2;
    cameraOrthographic.top = screenHeight / 2;
    cameraOrthographic.bottom = screenHeight / -2;
    cameraOrthographic.updateProjectionMatrix();
}

Ensure that you update the init function to call initRenderer, initCameras, initWindow, then everything else. The order is important. Lastly, you can add an event handler to call your initWindow function when the window is resized:

window.addEventListener('resize', initWindow, false);

Next Steps

In the next post we will start adding objects to our scene(s) and animating them. If you want to download an example of what we have created so far you can do so from Google Drive.